#MadeWithARKit - A peek into our Hackathon
TL'DR
The concept of Augmented Reality has been around for a long time, in various forms like headsets and touch panels, but it wasn’t until the beta release of ARKit from Apple that it really struck home. With over 2000 apps on the app store and more than 13 million downloads, nothing else has brought Augmented Reality to the mainstream like ARKit. Since the launch of iOS 11, we at Ideas2it - A leading dot net development company have long desired to wet our feet in the holy waters of ARKit but got perpetually sidelined due to other project commitments and availability of time. So, when an opportunity finally turned up we decided to jump headfirst into ARKit and learn as we go along.Ok. First things first. Aren’t AR and VR essentially the same?Not really. They are more like cousins than brothers. Augmented reality combines virtual objects with the real world. It’s not the same as virtual reality, which completely replaces the real world with a simulated one. Virtual Reality would allow you to swim with the Great Whale whereas Augmented Reality would allow you to watch it pop out of your TV inside your own living room.The opportunities that AR presents are huge. They can be used -
- to visualize the internal features that would be difficult to see otherwise, like critical organs during surgery or the cooling system of an engine
- to interact like moving around new furniture in your living room or applying different shades of makeup to see how it looks without ever having to visit the store
- to instruct and guide like training and coaching new human resources or aiding a technician to understand the problem
For our use case, we picked the "Industrial Training using AR" module. Traditionally printed instructions for assembling products can be hard and time-consuming. Videos aren't interactive and in-person training requires trainees and instructors to meet at some commonplace. Training can also get delayed due to the non-availability of trainees, instructors or training equipment. AR can address all these issues by providing real-time, on-site, step-by-step visual guidance on tasks such as product assembly, machine operation, and maintenance.We wanted to transform 2D images in a manual book into interactive 3D models that walk the user through the necessary processes; We wanted to identify Individual equipment parts and make their information available via simple touches. With our goal set and a team of our best hackers assembled, we were given a 3-day deadline.Day 1We went through the official documentation for ARKit on Apple’s website which was quite adequate and complemented it with resources from Ray Wenderlich and Appcoda.ARKit blends digital objects and information with the environment by performing a combination of different complex actions. It does lighting estimation using the camera sensor, analyses what's presented by the camera view, finds horizontal planes like tables and floors and then places and tracks objects on anchor points (referred to as “world tracking” by Apple).This technique is called visual-inertial odometry and it utilizes the iPhone or iPad’s camera and motion sensors. ARKit finds a bunch of points in the environment, then tracks them as you move the phone. It doesn’t create a 3D model of a space, but it can “pin” objects to one point and change its scale and perspective.Everything in ARKit seems to revolve around 6 key terminologies.
- SceneKit view: A component that lets you easily import, manipulate, and render 3D assets, which lets you set up many defining attributes of a scene quickly.
- ARSCNView: A class in a SceneKit view that includes an ARSession object to manage the motion tracking and image processing that is required to create an AR experience.
- ARSession: An object that manages the motion tracking and image processing.
- ARWorldTrackingConfiguration: A class that provides high-precision motion tracking and enables features to help you place virtual content in relation to real-world surfaces.
- SCNNode: A structural element of a scene graph, representing a position and transform in a 3D coordinate space to which you can attach geometry, lights, cameras, or other displayable content.
- SCNPlane: A rectangular, one-sided plane geometry of specified width and height.
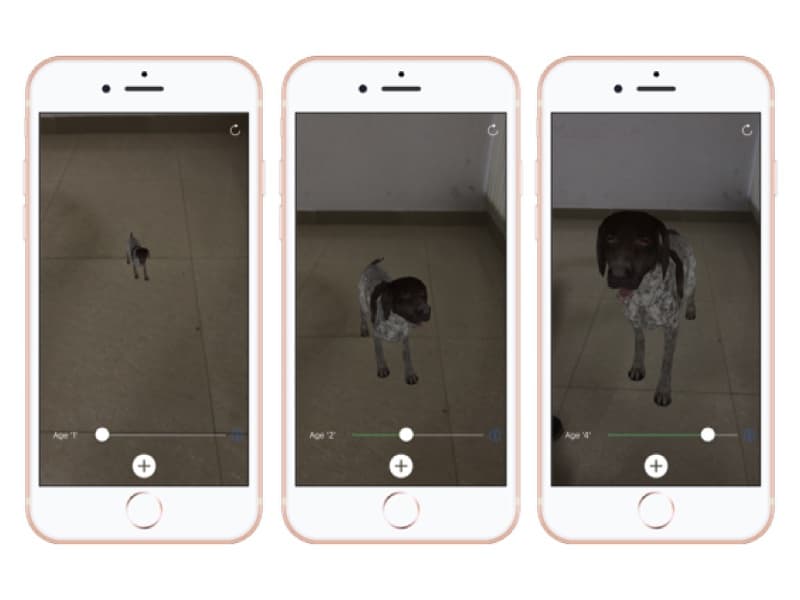
A lot of heavy lifting in ARKit is done by SceneKit. If you’re familiar with it you should feel right at home with ARKit.Our target for the day was to develop an application that detects plane surfaces and renders a 3D model on top of it. As much as we wanted our first AR app to overlay rabbit ears and flying unicorns over people’s faces we had a more pressing issue on hand. At Ideas2it we don’t have a residential pet and a no-dog policy. We wanted a virtual pet dog that can walk around our bay and sit next to us on our bean bags. With some of our colleagues in favor of puppies and some in favor of a fully grown adult, we needed to serve both as part of our AR experience.We used one of the free available 3d static models of a dog. To make it feel alive and play around we had to rig it. Rigging is the process of taking a static 3D model and creating a bone system, scripts, and other things to give the model the ability to move, change expressions and transform. We used Mixamo for rigging our dog model and SceneKit to render the animations. We also added a slider to scale our dog as if it grew up.

We named it as Bruno after one of our colleagues’ dogs, who recently went missing.Day 2SceneKit is based on the concept of nodes. Each 3D object we render using SceneKit is a node. It implements content as a hierarchical tree structure of nodes, also known as a scene graph. We can create a node programmatically or load them from a file created using 3D tools like Maya and Blender.Having worked a fair bit in SceneKit and growing in confidence after Day 1 we wanted to move around individual nodes in our 3D Scene back and forth in order to create a step by step training experience. We took a 3D model of a cycle and labeled each individual node uniquely with their respective parts names. Using the Scene editor in Xcode we moved individual nodes of our cycle model around. We then added a Next button upon clicking which we moved one node at a time programmatically back to its initial position relative to the parent and also a text display of the current instruction.

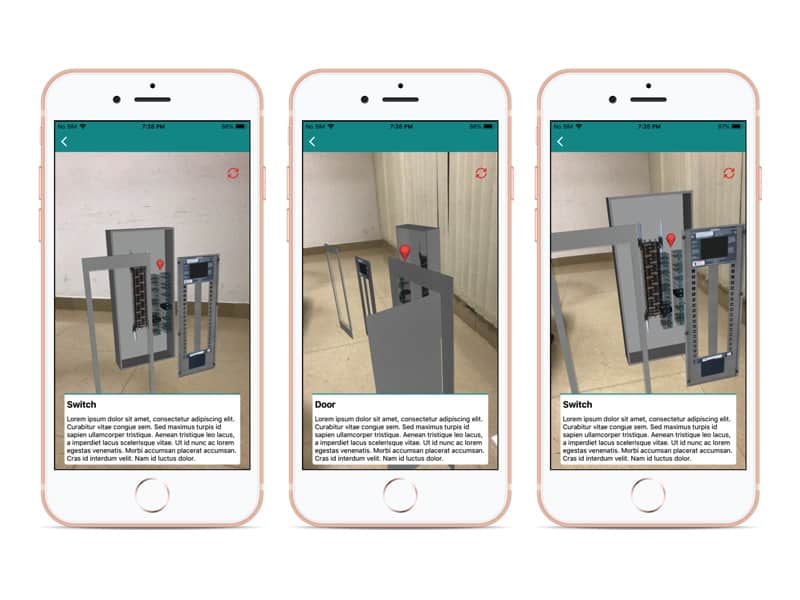
Day 3The final piece in our jigsaw was to detect each individual part and make it clickable thereby allowing the user to fetch their respective information by simple touches. We started initially with Vision API and Core ML to train our camera in identifying individual parts of an object but soon realized it didn’t work as we expected. Creating a large image dataset with different backgrounds, lightings, angles and training them for thousands of iterations was in itself a challenging task but more importantly, we couldn’t differentiate between two similar things in an image. For example, it was easy to identify light switches in a picture but difficult to tell which switch was the Master Switch for Left-Wing and which one was for the Right Wing. So we eventually ditched the idea of image recognition and instead decided to place markers, like in a map, so the user can click on them and we could display their information via a pop-up window.

And with that, we completed our first prototype of an Instruction and Guide AR app.ConclusionARKit is great but not perfect (at the time of writing this). It didn’t perform well in poorly lit rooms. On surfaces without much texture or contrast, like bare white walls and plain floors, it took longer to track as the library needed more data to process. There was also the peculiar case of inconsistent positioning where the 3D model suddenly shifted from time to time without us actually moving the device. But the biggest concern for Apple should be the battery life. An augmented reality app uses the camera, displays intensive graphics and performs intensive calculations all at once which inevitably drains the battery. Apple has done an amazing job to get here so one can expect them to fix this drifting and battery issue in one of their future releases.The other big takeaway from our 3-day hackathon and something we would like to share with our fellow and future AR developers is that it is easy to get swayed by the power of ARKit. Just because it is awesome doesn’t mean we have to use it in everything we work. The crucial part is understanding when and whether the technology can add real value. Overlaying something virtual on a mobile screen might be fun today but would appear artificial soon and people would tire of it. We should be careful in integrating the technology so that it makes the customer experience more easier, better and more convenient. And that, in essence, should be the real mission of enterprise AR.Are you looking to build a great product or service? Do you foresee technical challenges? If you answered yes to the above questions, then you must talk to us. We are a world-class custom .NET development company. We take up projects that are in our area of expertise. We know what we are good at and more importantly what we are not. We carefully choose projects where we strongly believe that we can add value. And not just in engineering but also in terms of how well we understand the domain. Book a free consultation with us today. Let’s work together.


.png)
.jpeg)
.avif)


